High-Level Architecture of the Main Framework Used in the Application
## The MEDomics platform architecture
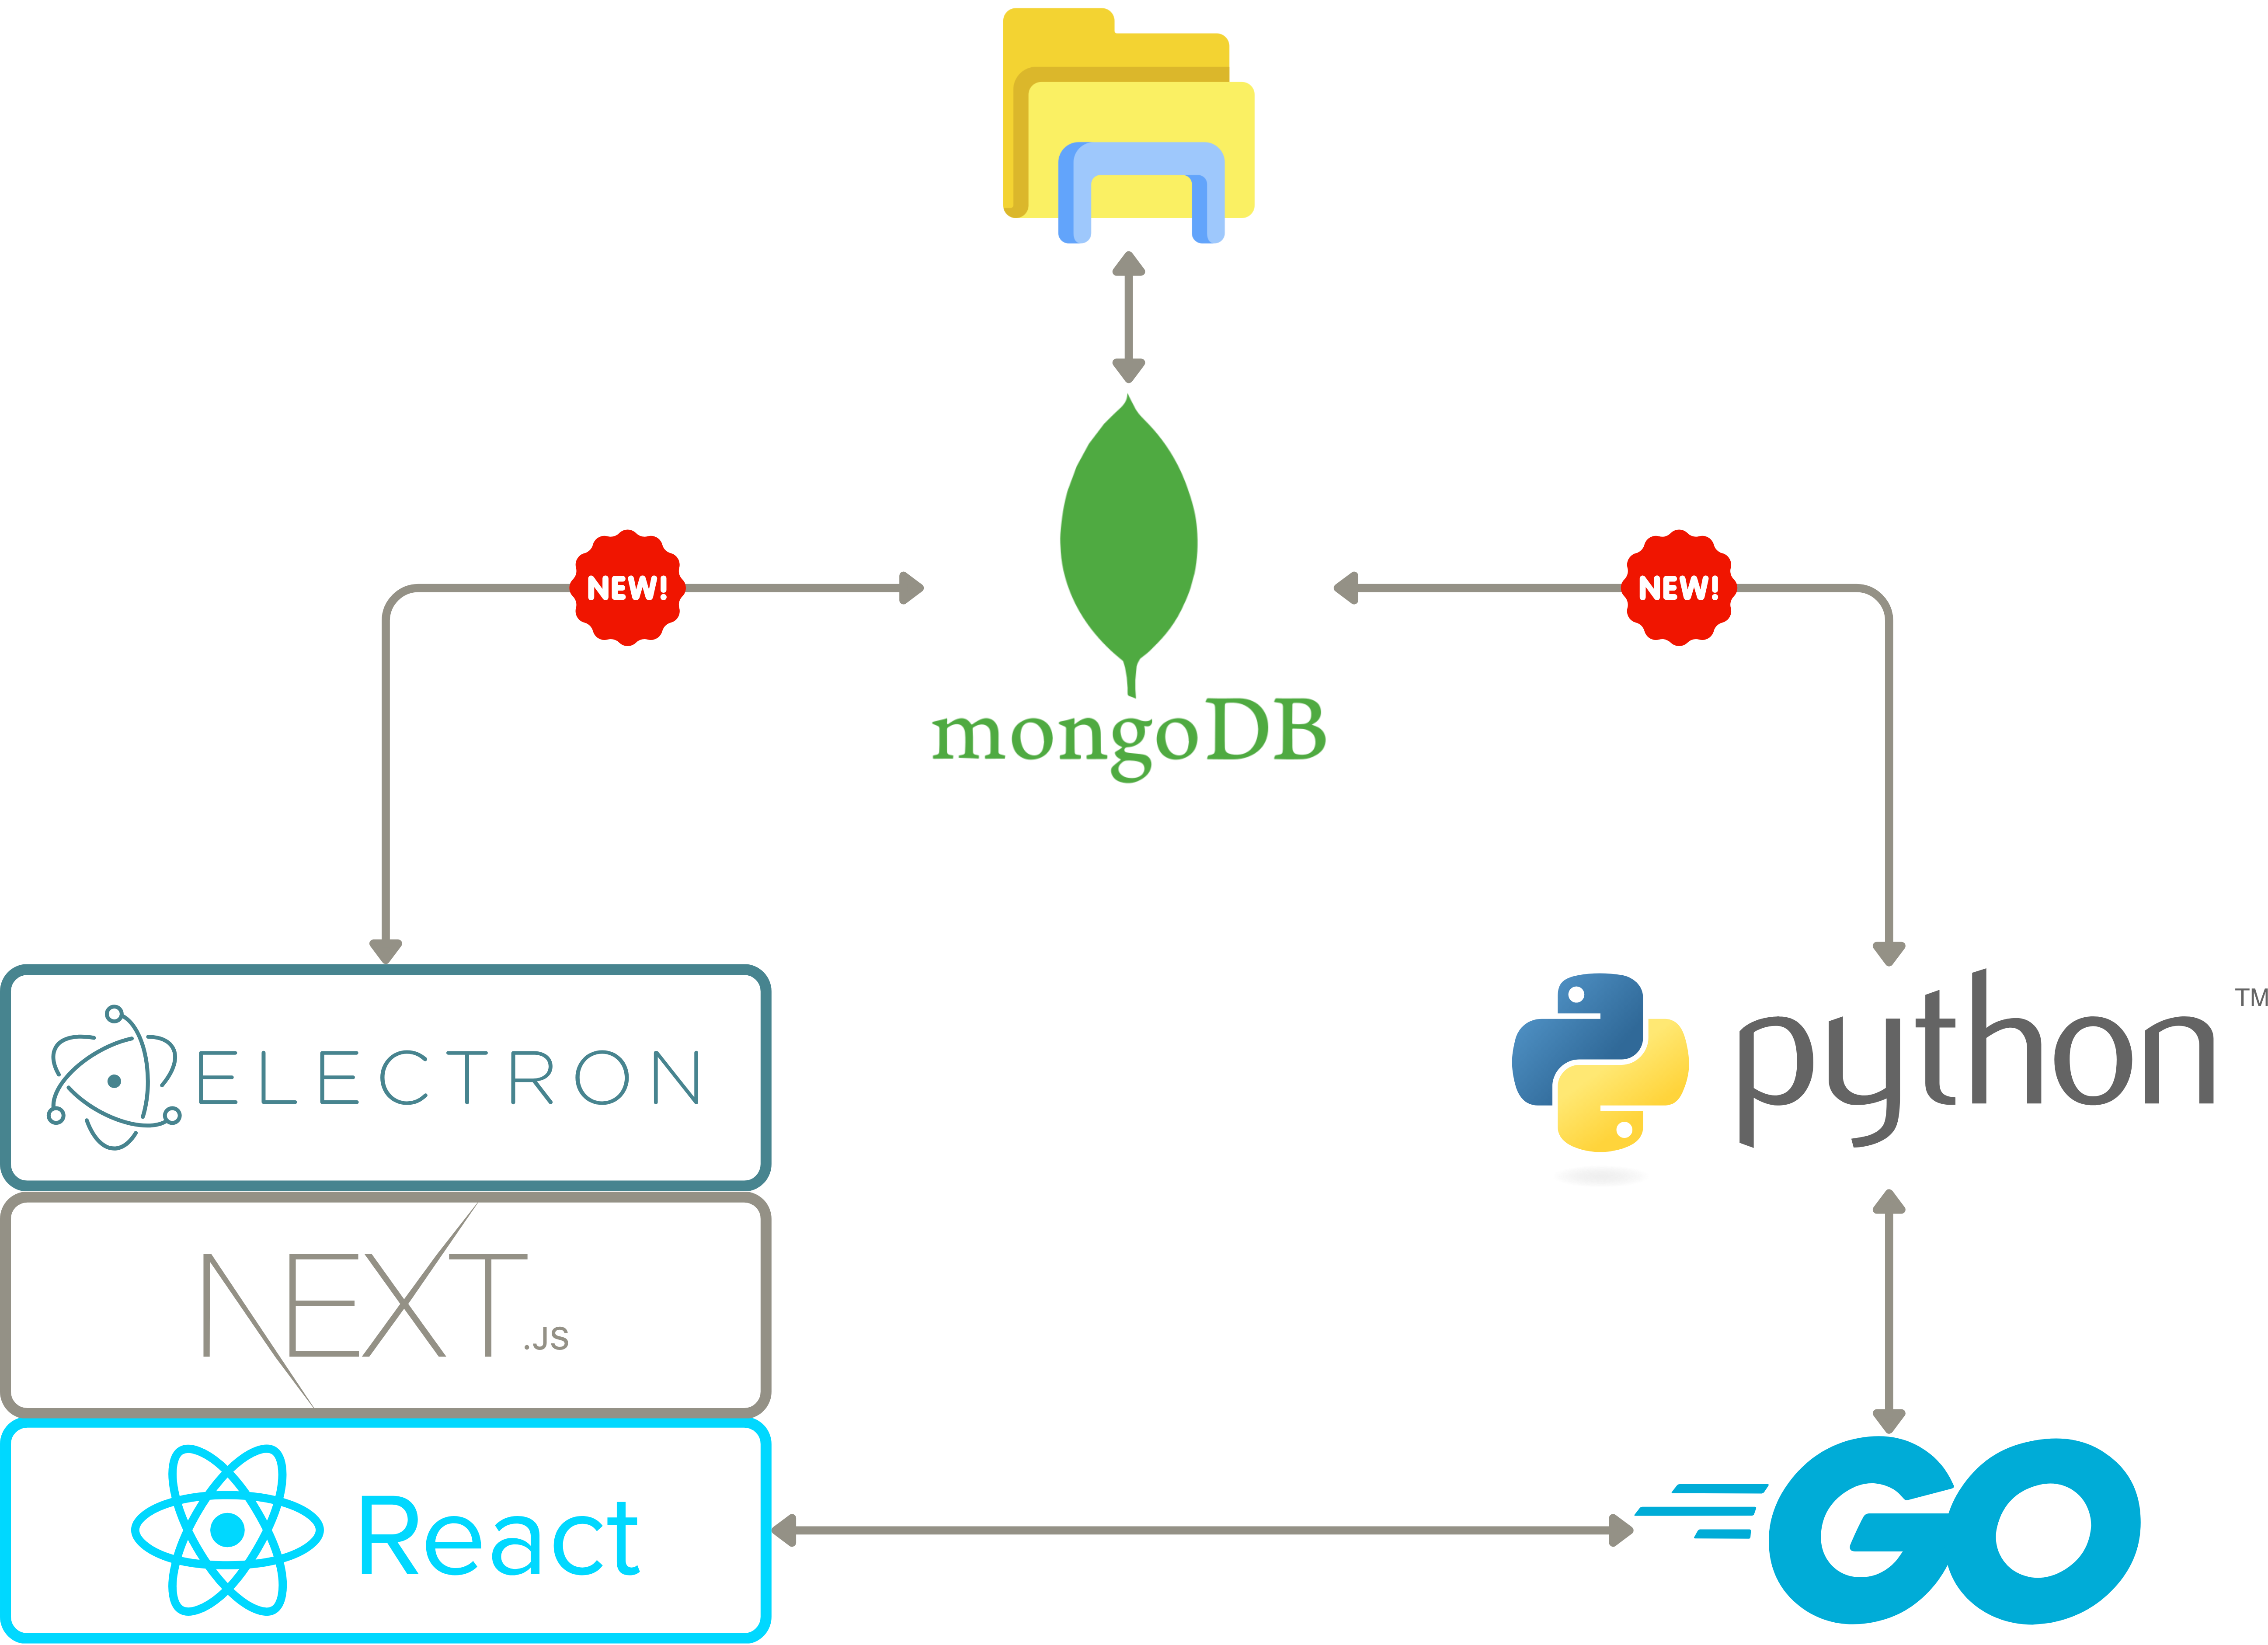
The map below illustrates the organization of files, modules, databases, and the Frontend-Backend connection within the MEDomics platform. This visual guide is designed to support new contributors in understanding the application’s structure, streamlining the integration of new features, and aiding efficient navigation through the codebase.
{% embed url="" %}
the MEDomics platform detailed architecture
{% endembed %}
## Set up from the ground up 🌱
{% hint style="info" %}
Go visit our [GitHub development branch](https://github.com/MEDomics-UdeS/MEDomicsLab/tree/develop#medomicslab---develop-branch-%EF%B8%8F)!
{% endhint %}
#### 1. Installation of MongoDB Community Edition
Follow the installation instructions depending on your OS for [MongoDB Installation](https://www.mongodb.com/docs/manual/administration/install-community/#std-label-install-mdb-community-edition).
{% tabs %}
{% tab title="Windows" %}
[Install MongoDB on Windows](https://www.mongodb.com/docs/manual/tutorial/install-mongodb-on-windows/#install-mongodb-community-edition)
* Do not install MongoDB as a service.
* You do not have to install MongoDB Compass.
* You do not have to install mongosh.
* Do not forget to [add MongoDB binaries to the System PATH](https://www.mongodb.com/docs/manual/tutorial/install-mongodb-on-windows/#add-mongodb-binaries-to-the-system-path).
{% endtab %}
{% tab title="Linux" %}
[Install MongoDB on Linux (Ubuntu)](https://www.mongodb.com/docs/manual/tutorial/install-mongodb-on-ubuntu/#install-mongodb-community-edition)
* Install the latest version of MongoDB
{% endtab %}
{% tab title="Mac" %}
[Install MongoDB on Mac](https://www.mongodb.com/docs/manual/tutorial/install-mongodb-on-os-x/#install-mongodb-community-edition)
{% endtab %}
{% endtabs %}
#### 2. Installation of MongoDB database tools
Follow the installation instructions depending on your OS for [MongoDB Database Tools Installation](https://www.mongodb.com/docs/database-tools/installation/installation/).
{% tabs %}
{% tab title="Windows" %}
[Install MongoDB Database Tools on Windows](https://www.mongodb.com/docs/database-tools/installation/installation-windows/#installation)
* Install with the MSI Installer.
{% endtab %}
{% tab title="Linux" %}
[Install MongoDB Database Tools on Linux](https://www.mongodb.com/docs/database-tools/installation/installation-linux/#installation)
* Install with the DEB package.
{% endtab %}
{% tab title="Mac" %}
[Install MongoDB Database Tools on Mac](https://www.mongodb.com/docs/database-tools/installation/installation-macos/#installation)
* Install with Homebrew.
{% endtab %}
{% endtabs %}
### 1. Installation of Nvm
* [NVM for Windows](https://github.com/coreybutler/nvm-windows)
* [NVM for Ubuntu](https://github.com/nvm-sh/nvm#installing-and-updating)
### 2. Installation of npm/node.js
```
nvm install lts
nvm use lts
```
### 3. Clone the repository
{% hint style="warning" %}
We are currently using *develop* as our integration branch.
{% endhint %}
{% tabs %}
{% tab title="HTTPS" %}
```
git clone -b scalability https://github.com/MEDomics-UdeS/MEDomicsLab.git
```
{% endtab %}
{% tab title="SSH" %}
{% endtab %}
{% endtabs %}
### 4. Set up server-side (Go)
#### 4.1 Installation of Go
1. Download the latest stable release of Go from the official website:
2. Follow the [installation instructions](https://go.dev/doc/install) for your operating system.
#### 4.2 Setup of environment
{% tabs %}
{% tab title="Windows" %}
Execute these commands in a **CMD** prompt:
```
setx GOPATH %USERPROFILE%\go
setx PATH "%PATH%;C:\Go\bin"
```
{% endtab %}
{% tab title="Linux and Mac" %}
Execute these commands in a terminal:
```
echo 'export PATH=$PATH:/usr/local/go/bin' >> $HOME/.bashrc
echo 'export GOPATH=$HOME/go' >> $HOME/.bashrc
echo 'export PATH=$PATH:$GOPATH/bin' >> $HOME/.bashrc
```
{% endtab %}
{% endtabs %}
After, **close all your terminals** because these commands will take effect on the initialization of any terminal
#### 4.3 Verify installation
1. Open a new terminal
2. Run the command `go version`
3. If Go is installed correctly, you should see the version number printed to the console.
#### 4.4 Setup for the application
1. Open a new command prompt and go to the `/go_server` directory.
2. Run the command `go run main.go` (on first time, it should download the required libraries and launch the server)
3. You can terminate the process by pressing `CTRL + C`
4. Finally, build the app by running `go build main.go` (It should create an executable file -> that file will be run by the client-side JavaScript, so modifications to `.go` files must be followed by a rebuild. Congratulations, you're now ready to start developing Go applications!
### 5. Init submodules
```
cd <.../MEDomicsLab/>
git checkout dev_lab
cd ../MEDprofiles
git checkout fusion_MEDomicsLab
```
### 6. Start the electron app!
{% code fullWidth="false" %}
```
cd <.../MEDomicsLab>
npm install
npm run dev
```
{% endcode %}
{% hint style="warning" %}
On **Windows**, if you encounter error messages when running `npm install`related to tensorflow .dll files missing, revert your node version by following these steps:
* [Download node v18.16.1](https://nodejs.org/fr/blog/release/v18.16.1)
* Add to the PATH variable the path to your new node placing it higher than the old node.
* Test your node version using: `node --version`
{% endhint %}
{% hint style="info" %}
**MongoDB configuration**
The MEDomicsLab platform uses **port 54017** as the default MongoDB connection port. For database visualization and management, we recommend using [MongoDB Compass](https://www.mongodb.com/products/compass), the official GUI client from MongoDB.
**Key Details**:
* Default Port: `54017`
* Recommended Client: MongoDB Compass
* Connection String Format: `mongodb://localhost:54017/`
{% endhint %}
{% hint style="info" %}
#### Modify startup settings
1. Go to file `medomics.dev.js`
2. Here is a description of the Object:
```javascript
const config = {
// If true, the server will be run automatically when the app is launched
runServerAutomatically: true,
// If true, use the React dev tools
useReactDevTools: false,
// the default port to use for the server, be sure that no programs use it by default
defaultPort: 5000,
// Either "FIX" or "AVAILABLE" (case sensitive)
// FIX -> if defaultPort is used, force terminate and use defaultPort
// AVAILABLE -> if defaultPort is used, iterate to find next available port
portFindingMethod: PORT_FINDING_METHOD.FIX
}
```
{% endhint %}
## To Test the Production Build
### Build the Electron app and run the built version
{% tabs %}
{% tab title="Windows" %}
```
npm run build:win # build and package the application
.\build\dist\win-unpacked\MEDomicsLab.exe # Run the executable of the built version
```
{% endtab %}
{% tab title="Linux" %}
```
npm run build:linux # build and package the application
bash build/dist/linux-unpacked/medapp # Run the executable of the built version
```
{% endtab %}
{% tab title="Mac" %}
```
npm run build:mac # build and package the application
bash build/dist/mac-arm64/MEDomicsLab.app/Contents/MacOS/MEDomicsLab # Run the executable of the built version
```
{% endtab %}
{% endtabs %}
> The built app will be located in the `build/dist` folder